And here is the Kitchen faucet reveal. It looks even better than I imagined. The color and style fits perfectly with the rest of the house, but still has wonderful modern (well, modern compared to 200 years ago) features such as the sturdy sprayer and 180 degree turn radius of the faucet. If I had to give one complaint about the faucet it would be that it is slightly too high. I like it being so high, because it's perfect for washing large pots, cookie sheets, platters, etc, but when washing smaller things it does cause a lot of splashing. I'm messy in the Kitchen, and that includes washing dishes, so I'm used to the front of my shirt getting wet when I'm cleaning up, but I'm finding that this faucet splashes more than others. The sink isn't deeper than usual (it's 9" deep I believe), so if the faucet was maybe 1 or 2 inches shorter, it would have been perfect. But... I'm not complaining. Like I said, it'll be nice to be able to wash things without having to struggle with the faucet being in the way!
We're having a hard time adjusting to there being running water in the Kitchen. We keep finding ourselves walking to the bathroom to rinse a dish or our hands. After all, we've been in the house for 3 1/2 months now without any use of a Kitchen sink.
The Kitchen is really starting to come together and I'm 100% pleased so far! Hopefully it'll be ready in time for Christmas cookie baking!!
Monday, November 15, 2010
Saturday, November 13, 2010
Countertop Pictures... Finally!
Our Kitchen countertops were installed on November 1st. I love them so so much. It's hard to look at old pictures of the Kitchen and even remember what the Kitchen used to look like.
Like I said in a previous post, the countertops were purchased from and installed by Renaissance Stone in Wallingford, CT. There were a couple issues on installation day... they chipped a corner when they were putting the range back in place, there are two small nicks in the corner near the window, there was some damage (cracking maybe) around the faucet holes that they attempted to fix, and they may or may not have scratched the side of the range. But all in all, it looks great, and that's what matters right?
The countertop is Black Impala granite, 1 1/4" thick. Black Impala is a great compromise for couples who want grey and black. It has a nice, consistent pattern to it, and looks amazing in the sunlight.
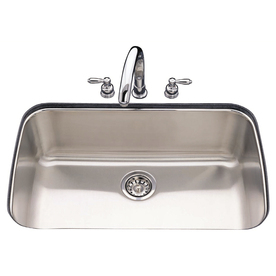
Renaissance also mounted our sink for us. I love this sink. Its the perfect width and depth.
Wednesday, November 10, 2010
Range
A client of mine recommended Sears Outlet for appliances. He knew we were on a majorly tight budget, and as long as we didn't mind a scratch or two, we'd get great deals here. I never knew this place existing, but I'm glad I do now. It's a huge warehouse filled with refrigerators, ranges, dishwashers, washers and dryers, just to name a few! It was crazy! We had to restrict ourselves to the range area so we wouldn't buy all of the other appliances we eventually need!
I knew I wanted a glass top electric stainless steel range. 5 burners would be a plus. I found a couple contenders, so similar it was almost impossible to tell the difference between them. And then I went around the corner and found the perfect range.
Love Love Love! It's a Kenmore 9290... Convection oven, warming drawer, 5 burners, one burner is a Turbo boil, one can be a warming burner, and another can vary in size from small to mega big. It has tons of special features such as oven lock-out, self cleaning (don't they basically all now?), and something called Air-Guard, which can either lock in smells or allow them to freely scent your Kitchen. Ryan doesn't really get this one... why would you be cooking something that smelled bad? But I still think it's cool. A couple features I really like are the convection convert (I enter the temperature as I would on a conventional oven and it converts it to a proper convection oven temp), the updated temperature as the oven heats up (I do miss my old oven's countdown though), and the very large oven, with an extra shelf on the bottom (it can fit 4 1/2 (the 1/2 is a small shelf that goes on top of another) shelves, and according to the manual, can bake approximately 100 cookies at a time! And everything I bake comes out perfect! And boiling water on the cooktop doesn't spill over the top of the pot. It's the little things that make me happy these days :)
And thanks to Sears Outlet, we got this amazing range for half the price we would have paid in a Sears store. And the only things wrong with it are 2 scratches on the side that are hidden by the countertop. Sweet :)
Tuesday, November 9, 2010
Kitchen Lighting
We haven't installed any of the new Kitchen light fixtures yet, but they've all been purchased. Lighting is one of my favorite parts of my job... I love choosing new light fixtures! There's so much to choose from!
The first fixture will be installed in the cabinet above the sink. I've never really seen anything done like this before, but putting an undercabinet light here didn't seem like it would provide enough light. And I'm not a fan of those small fluorescent lights you sometimes see installed under cabinets above sinks. I bought a pendant light. I've seen pendants installed over sinks when they're in front of windows and I'm not really a fan because they block the view out the window. But here, I'll just have a beadboard backsplash, which will make a nice background for the pendant light. The stem can be adjusted so that it's very very short (it almost won't look like a pendant). The shape and style match the next light fixture.
This light fixture will be installed in the general work area of the Kitchen. It is replacing a flush ceiling mount fixture. This fixture will be pretty close to the ceiling, but lowered enough so that it will throw some light onto the ceiling. It's a very simple fixture that I think will match well with the rest of the house.
For over the Kitchen table I wanted something more traditional. Since this half of the Kitchen is kind of set apart from the rest of the Kitchen, I felt it was okay to change things up a bit. This fixture will be centered above our traditional table, as well as centered on the fireplace and built in cabinet. It is very similar, but slightly less formal, to the fixture I am planning on purchasing for the Dining Room. If you look carefully you'll notice that the shades have a similar shape as the glass shades of the other two lights.
Anyone looking to buy light fixtures, please check out www.bellacor.com. I've used them for work before and have always found that they have a great selection and great prices. And you can't beat their quick delivery times! (And no, they haven't paid me to say this.. I'm just that pleased with them!)
Here's the specifics on the Kitchen Lights:
1:
Manufacturer: Murray Feiss
Retailer: www.bellacor.com
Model: Barrington Oil Rubbed Bronze Mini Pendant
Finish: Oil Rubbed Bronze
Price: $70
2:
Manufacturer: Murray Feiss
Retailer: www.bellacor.com
Model: Barrington Oil Rubbed Bronze Small Semi-Flush
Finish: Oil Rubbed Bronze
Price: $70
3:
Manufacturer: ?
Retailer: www.overstock.com
Model: Iron 5-Light Black Chandelier
Finish: Black
Price: $107
Monday, November 8, 2010
Kitchen Garbage Disposal
I've never lived anywhere that didn't have a garbage disposal. It's just second nature to me to throw food waste into the sink. So of course we had to get a garbage disposal.
Because we don't anticipate abnormally heavy use of the disposal, we went with a lower HP model. We chose the InSinkErator Badger 1. Purchased at Home Depot for $90.
Not only are garbage disposals convenient, they are also green, which isn't something everyone immediately thinks of. By using a garbage disposal, you're eliminating waste that would have gone into a dump. They are extremely efficient, using only about 5 kwh of electricity a year and 1 gallon of water a day on average.
Saturday, November 6, 2010
Kitchen Sink
At work we always specify Franke sinks. However... Franke sinks typically have a price tag that is out of our small budget. I looked at a lot of sinks at Lowe's and Home Depot, but they all looked or felt cheap. Or they were just ridiculously expensive and I could not justify paying that for a Kitchen sink. Not when there were so many other things I needed!
That was when I discovered a small sister company of Franke. Kindred. They're basically Franke sinks, but with slight differences, such as the stainless steel gauge. I found this one at Lowe's, but unfortunately our local store didn't have any in stock. That lead me online, where I attempted to find the best deal.
I ended up buying the sink from www.homeperfect.com for $105 (including shipping). Lowe's had it listed for $292 (plus tax)! So glad I looked online! The sink arrived in perfect condition (so glad, after the faucet debacle), and we handed it off to Renaissance Stone for installation. Renaissance did a great job installing.. leaving a perfect overhang of granite over the sink. In our apartment we had granite countertops and an undermount stainless sink, but it wasn't installed correctly. There was a stainless steel lip that was visible between the granite and sink where dirty food gunk (for lack of a better word) would loge itself. It was nasty and very hard to clean.
Here's the specifics on the Kitchen Sink:
Manufacturer: Kindred
Retailer: HomePerfect.com
Model: Single-Basin Stainless Steel Undermount Kitchen Sink (USSK100-18)
Finish: Stainless Steel Mirror Finish
Price: $105
Review: This sink is gorgeous! The mirror finish gives it a nice shine. It seems so much bigger (wider and deeper) than I had imagined! I love it! And you can't beat that price... $105 for a huge sink! Kindred offers a lot of additional products that fit the sink such as strainers, cutting boards, etc. that I may take them up on.
Lesson I learned with this purchase? Always shop around!
Thursday, November 4, 2010
Kitchen Faucet
I haven't uploaded any new pictures of the half-complete Kitchen yet because it's so dark when I get home and the pictures just don't do the room justice. The best time of day in that part of the house is in the morning... it's just overflowing with sunlight. So the pictures will just have to wait until a weekend.
But....
Because I'm so excited about my new Kitchen, each day until then I'll share with you a part of my Kitchen. Today, it's the faucet.
The house has most of it's original door hardware, which is black. To match this, any new hardware we're adding is oil-rubbed bronze (ORB), which I just happen to love. The new deadbolt and door knob in the Kitchen is oil-rubbed bronze, and I decided that the cabinet hardware will also be ORB. So when it came to looking at faucets, anything else just didn't look right. You'd be surprised how hard it is to find a reasonably priced ORB Kitchen faucet!
I found some at Home Depot and Lowe's that I really liked by Price Pfister. They were very simple, ORB, and had good prices. This one is the Avalon.
I had never heard of Price Pfister before, so I wanted to do some research on them. Couldn't come up with ONE GOOD REVIEW! They all said that they were cheaply made, broke all the time, the soap dispenser never worked, the sprayer has no pressure, it leaks constantly, etc. etc. etc. No way I'm spending $180 for a faucet in a brand new Kitchen that would break after using it once! But I did really like the color, and the option of a soap dispenser.
Long story short... couldn't find another reasonably priced colonial-looking ORB faucet with a pull-out spray or soap dispenser. But I did find this faucet both on the Home Depot website and Amazon. They didn't sell it in stores, which was a little upsetting because I like to see it in person and play with it before purchasing. But, we needed a faucet, so I bought it from Amazon for $125. This faucet is the Glacier Bay Lyndhurst Bridge.
The faucet arrived a couple days later via UPS. The box it was packaged in had the faucet laying down, in hardly any packaging (there was a plastic bottom shell it laid in, and the faucet itself was in a plastic bag). The box was completely beat up... holes, dents, tears, stains. Half a roll of packing tape had been wrapped around one half of the box, as if to repair these beatings. It took me 15 minutes to just get the box open. The faucet looked great! But as soon as I took it out of the box to show R I realized that the bottom piece of each base was cracked and broken. I was heartbroken. I couldn't install a broken faucet! And the granite company needed the faucet the following day for templating, so I couldn't even send it back!
R convinced me to give the broken faucet to the granite installer, telling them that it was being returned because it was broken. Then I ordered a new faucet from Home Depot this time, so that if it also arrived broken we could at least return it to the store easily. The faucet from HD arrived a couple days later in great shape. HD had the small white box inside a large thick cardboard box, which was delivered via FedEx in perfect condition. Kudos to HD on their great packing job! And on top of it all, I had $75 worth of HD gift cards, so the faucet only cost me approximately $58 including shipping!
It's no easy task to return a faucet to Amazon though... I have 2 options. I can return it myself and pay for shipping or I can request Amazon to set up a UPS pick-up. But it has to be picked up where it was delivered... so I can't have it picked up at work, where I am all day. It's a big pain in the butt... so the faucet is still sitting in our Living Room, waiting for deliberation.
I'm so glad I read those bad Price Pfister reviews... otherwise I would have bought/installed a faucet that didn't look nearly as nice as the one I ended up getting and was more than $50 more expensive.
Here's the specifics on the Kitchen Faucet:
Manufacturer: Glacier Bay
Retailer: Home Depot
Model: Lyndhurst Bridge Kitchen Faucet with Side Spray
Finish: Oil Rubbed Bronze
Price: $123
Review: Looks and works great! This faucet adds a perfect blend of colonial and modern aspects to our Kitchen. It was very simple to install. The faucet is raised very high, which is great for filling pots and washing large dishes, and also turns 180 degrees, which is great with a large sink. The sprayer has great pressure, and is not cheap at all! It is very heavy (both a good and bad thing), so I have no worries that it'll break or wear down over the years. I would definitely recommend this faucet. Gives the looks and feel of a very expensive faucet, without the high price tag.
Monday, November 1, 2010
Countertop Teaser
Our Kitchen countertops got installed this morning. We chose 1 1/4" thick Black Impala granite with a pencil edge. The granite was cut and installed by Renaissance Stone in Wallingford, CT. They did a good job for the most part, but we weren't as pleased with the installers. They showed up late both times (template and install), which was frustrating because R had to take time off from work to wait for them. But the important thing is that the countertops are in, and look amazing! I love the color of the Black Impala... it's a compromise. I wanted gray, R wanted black. Black Impala is a mid-dark gray with a slight bluish tint. The stone has a great variation to it (not a solid color, but not crazy busy).
So here's the teaser pic.. More to come in a formal countertop blog entry, and I promise they won't be cell phone quality :)
Sunday, October 31, 2010
Painting the Living Room
This weekend we decided to finally work on the Living Room. Before we bought the house, we decided that the Living Room would be the first room we'd work on and finish. That way we'd have a "clean" room to go to relax or eat while we were doing all of the major work on the rest of the house. That didn't work out exactly as planned.
On Day 2, we removed the wallpaper in the Living Room. That revealed original plaster walls, which were in okay shape for 240 year old walls, but weren't exactly to our liking. They had a very rough finish (felt/looked like rough stone) and the previous owners had scoured the plaster when they were hanging the wallpaper, which resulted in holes in the plaster which had dry sand flowing out. So we abandoned the room and moved on.
Fast forward 3 months, and we're now living in the house and need our Living Room! For the first month we lived here we had our TV set up and our two couches. That's it. 3/4 of the room was covered in boxes and tools. We had a 18" path that went from the Kitchen to the couches. I could only sit on one half of my couch if I wanted to see the TV without boxes blocking it.
So when my SILs said they were coming down for the weekend, I immediately knew what we had to do. It took a whole half day to just clean everything out of the room. With only the couches and TV cabinet left the room looked huge!
Our first act was to clean everything with TSP. **We really should have stripped all the paint from the trim and doors, but in the essence of time, we decided to just paint over it. This is something that is on my long-term To Do List though. There are about 9 layers of paint already on the trim, and it's very clumpy looking. It WILL get done eventually though!** The trim wasn't very dirty, but the walls were. The TSP cleaned off any remaining wallpaper and glue, as well as years of dirt. We decided that the casing around the doors would need either major sanding or the paint stripped because they were in pretty beat up shape. So for this weekend, we skipped over the door casing.
Then it was time to fill in the holes and sand the walls where possible. It would be impossible to have perfectly smooth walls, and frankly, we didn't want that, so rather than sanding the patches completely, I left them a little bumpy. That way they blended well with the rest of the wall.
The picture totally doesn't do it justice, but the walls already had many years of patches. And none of the patches were white. There were beige patches, yellow patches, green patches (I don't get that one...), brown patches, etc. It took 3 coats of paint to cover all of them completely!
By the end of the weekend, we had the entire fireplace wall (trim and wall), summer beam (large beam in the center of the room) and half of the closet wall painted. That's the work of 3 people for a day and a half! Like I said... 3 coats of paint on the walls and 2 or 3 on the trim. But it looks great so far! At first I didn't like the color... it had a pinkish tint to it, and looked metallic in the sunlight. But by the end of the day today, I really liked it. I have a feeling that it was the way the first coat of paint was covering, and also the comparison between the color and the ugly whitish wall.
![]() |
| See? Doesn't it look pinkish? |
I won't do a before-after picture yet, because it's not done... but what do you think so far???
Friday, October 22, 2010
Second Bath Faucet
These faucets were actually one of the first purchases for the house. Immediately after closing we went to Home Depot to buy a bunch of things (most importantly, new locks/keys). While there, we bought these two faucets, intending to use them in the upstairs bathroom. However, once we got back to the house, we realized that the bathroom was in worse shape than we remembered while at the store. So for 2 1/2 months the faucet boxes were used as door stops. I kept meaning to return them... we weren't remodeling the bathroom, so why keep them? I'm glad we didn't return them, because we decided to re-do this bathroom after all, and they look great! My only complaint about them is that to get the water coming out at a good pressure/decent amount, you need to turn them as far as the handle will go. I know that this is a problem with the faucet, not our plumbing, because this didn't happen with the old faucets. But for $20, I wasn't expecting the world.
Manufacturer: Glacier Bay
Retailer: Home Depot
Model: Constructor 4 in. 2-Handle Low-Arc Bathroom Faucet
Finish: Brushed Nickel
Price: $20
Thursday, October 21, 2010
New Toilet
The major purchase for the bathroom was the toilet. After a lot of discussion at Lowe's, we settled on the Jacuzzi Maxima White Elongated Toilet for $179. We had an elongated toilet in our apartment and fell in love with it. We just couldn't go back to a round toilet, even though they were slightly cheaper. It came down to the Jacuzzi or an American Standard. The American Standard was $5 cheaper, but the Jacuzzi looked so much nicer. And for only $5 more, you might as well go with the nicer looking one right? Guys just don't understand stuff like that..
There are a couple negative reviews online about this toilet, regarding the flushing and amount of water involved. It's a water saving toilet, so it doesn't use very much water. Duh. We've had the toilet for about a month and a half now and haven't had any trouble. Once. Once R had to flush twice. Not bad when you consider how little water it uses. And the box claimed it's clog free... and so far it has lived up to that.
We had a little trouble installing it, because we had to slightly raise the floor. Even the extra jumbo wax ring R got from Lowe's wasn't tall enough. But luckily he found one at a local plumbing supply store. Other than that, it went in pretty easily!
Wednesday, October 20, 2010
$2 Countertop
A brand new countertop, for $2, purchased at your local cheap-o store (aka Big Lots, which often has a lot of good house necessities, for really cheap. Wouldn't ever buy food there, but other stuff is good!).
A client of mine at work mentioned to me that 10 years ago when they bought their house, she couldn't stand the Kitchen countertops. Because the huge remodel we're now doing for them wasn't in their budget at the time, she bought a couple packs of contact paper and covered the countertops with the contact paper. I was in that house for months, measuring, designing, meeting with them, etc. and never realized it was contact paper! So when cleaning our lime green countertops just wasn't working, I went digging in the bag of contact paper that the client gave me. While the brown color she used wasn't exactly my style, it was still a good idea. Rolls of contact paper were only $2 at Big Lots, and I found one that had a granite-ish pattern to it, and was really the only option they had (everything else had flowers or fruit).
I tried to do some research online, but nothing seemed really helpful. So one night after work I just decided to go for it, and if it didn't come out good, I'd suck it up and go buy another $2 roll.
Turns out it's pretty easy! First I cleaned the countertop as best as I could. I didn't want any of the dirt or paint that was on the countertop staining or causing bumps in my new countertop. I started in one corner, with the backsplash, and very slowly and carefully rolled out the paper. I would peel off about 3" of backing, and then using my fingers push down the paper as flat as possible (and I'm a perfectionist, so it was definitely flat!). The hardest spots were the backsplashes and corners (corners were almost impossible!). When I got to a sink, I just rolled right over it, and then when I was done took an Xacto Knife and cut around the edge of the sink. It only took about 3 hours. R was shocked when I finally let him in the bathroom around 11:30 pm... he had been waiting outside the door wanting to see our "new" bathroom! I was so proud of myself! You can't see any seams and there aren't any bubbles (though my client gave me a good tip... if you do get a bubble, use a pin to pop it and then smooth it out).
Countertop Before
Countertop After
Monday, October 18, 2010
One Day Bathroom Remodel
We've been using the upstairs bathroom to shower, and the downstairs bathroom for everything else. And just the ten minutes I have to spend in the upstairs bathroom every day has given me major headaches. I've had them since the day we moved in and nothing relieves them.
So Ryan decided that we should use our one work day this weekend to remediate this (I think it was mostly to shut me up about my headaches). We could do some simple cleaning and cheap fixes to the bathroom to make it usable.
First was removing the carpet. Surprisingly there wasn't a forest of mold underneath it. There was a disgusting black pad though that had basically become one with the plywood subfloor though. That thing was not coming off, no matter how hard we tried. So we decided to put down 1/4 luan plywood right over it. We'll tear it up when we redo the bathroom correctly in a couple years, but for now, it just wasn't worth it.
Over the luan we put down some inexpensive vinyl tiles. It's not the most stylish floor, but it's about 300 times better than what was there.
We then painted the walls and ceiling with Kilz 2 to help seal in some of the bad smells and stains on the plaster. The walls were in pretty bad shape and it was amazing to see what just one coat of Kilz did. I also painted the vanity cabinet with Kilz... it went through an amazing transformation! This picture shows the nastiness that was the cabinet right next to the newly painted cabinet.
The existing yellow toilet looked really old. We know that the last people to renovate the house did so in the mid 1950's, but we were still surprised to find out that the toilet was manufactured in 1956. A 54 year old toilet. They just don't make them like that anymore.
We bought the toilet at Lowe's, which I would not have done if this were a more permanent remodel. We decided on the Jacuzzi Maxima Elongated Two Piece Toilet. It was only $5 more expensive than our other option, an American Standard, and this one looked a lot nicer.
The existing sink faucets were also replaced with some inexpensive Home Depot faucets. Nothing fancy, just better than what was there. A repainted vanity, new cabinet hardware and new paint on the walls, and we're done.
A brand new countertop was not in our budget for this room. Like I said, I didn't want to spend a lot of money on this because I'm planning on re-doing in the entire room in a couple years. So rather than spending $80 on a new countertop from Lowe's I re-did it for a mere $2. How you ask?
Sunday, October 17, 2010
Second Floor Bathroom
Our Second Floor Bathroom was scary! It had a moldy, constantly wet yellow (or at least it was yellow at some point in it's long life) carpet (yes, carpet), yellow sinks, mustard yellow wallpaper, and lime green countertops. And a yellow tiled shower, which was almost black with mold. There was mold all over the ceiling and plaster walls (underneath the wallpaper) as well. The faucets had clearly over lived their life expectancy. One of them was missing a drain (it was just a hole in the sink) and leaked no matter how tight you turned the handle. This picture was taken during our first walk-through, back in May. Everything you see there (including the wet, dirty towels and other disgusting personal items underneath the sink, and the full garbage barrel) was left by the sellers for us.
And this is the mold underneath the wallpaper.
The bathroom currently shares a space with the washer and dryer. The room was split in two by a previous owner, and you have to walk through the laundry area to get to the bathroom. When we eventually put on a Garage/Master Suite addition, the laundry will be moved to the other side of the house and this whole space will be bathroom. For this reason, we didn't want to spend a lot of money on the bathroom. In fact, we weren't even planning on using it. Ever. We'd just close the door and ignore it until time came to demo it.
But, nothing ever goes according to plan. The night we moved in, we discovered that the downstairs shower didn't work. So for the first month or so, we would shower in the nastiness that is this shower (no amount of bleach or cleaning could get rid of all of the black mold) and then use the sink and toilet in the downstairs bathroom. It was a huge pain! The carpet would squish under your feet, we had to bring in a free-standing lamp to light the shower area, and the countertop was unusable because it was my paint station, and was covered in painting supplies and dried paint (like I said, we weren't planning on using it, so it was a good place to wash brushes!).
So when a one day weekend presented itself to us, what better to do than tackle this bathroom and make it at least usable!
Sunday, October 10, 2010
My Office
I am always on my computer. Whether it's working on house designs, work, blogging, or just for fun, I'm always using it. In our old apartment my office consisted of my laptop and the couch. In our guest bedroom I had a table set up with some of my craft supplies, but that was such a multi-purpose room, the table was always covered with other stuff.
The day we first viewed this house, I fell in love with this room and knew it would someday be my office.
It was perfect! It has a central location, beautiful view out the windows, a built-in bookcase and a fireplace! And it's the only room in the house that has the potential for lots of bookcases. The only downside is that it was pretty dark and ratty looking. Even without the curtains on the windows, it was dark.
Luckily the wallpaper came off pretty easily. A helper and I took it all down in about 2 hours. We peeled off the grass layer, and then using spray bottles got the bottom layer wet, which made it peel right off. The walls underneath were pretty disgusting though. Aside from the wall with the windows, they were all newer drywall (when I say newer I mean from the '50's), but were stained and had a lot of holes. The wall to the left of the windows (seen in the next picture) was very poorly installed, and was very squishy.
We originally thought the wallpaper in this room was going to be the hardest in the house. The grass was so thick, and at first, didn't peel off nicely. But then we had the pleasant surprise of it being a piece of cake. Well, it came back to bite me when I started to paint. Before painting each wall I had to first wash it down with TSP, then sand the little bits and pieces of wallpaper left behind, then wash it again, then fill in the holes with putty, then sand again. THEN I could paint.
I decided to paint the trim, beams and fireplace surround a nice bright white. I love rooms with natural light, and the lighter the colors, the more reflective the light is. I used Glidden Semi-Gloss White. I made the mistake of not using any primer. The trim color didn't seem dark enough that I would need it. It took 4 or 5 coats of white to cover the yellowy-tan color. The paint on the beams was peeling and needed to be sanded, but I was a little worried it was lead paint. We bought a $9.95 lead paint test (good for 3 tests) at Home Depot, and it came out negative.
The color I chose for the walls is Lowe's La Fonda Mirage. It doesn't photograph 100% accurately, but it looks great in the room. Especially with the natural light shining on it. Because the wall underneath wasn't white (more of an off-white tan color with stains), in some areas it took two coats, but not everywhere. I was very impressed by the paint. The only downside was that because it took so long to prepare the walls and paint the trim (which I needed to do before painting the walls), I waste a lot of paint. I used up the entire gallon of paint on this tiny room and I still wasn't done! But luckily Lowe's sells those small sample bottles of paint, so I got two of those and only ended up needing half of one.
We still need to paint behind the radiator, but I skipped that for now because we're planning on having the radiator replaced because it leaks. A lot. The wall behind the radiator still has old wallpaper, which was on the walls before the grass wallpaper. We can't get behind it without disturbing the already leaking radiator. But for now, I just put my table in front of it and you hardly notice it.
The room is far from being finished (I need bookcases, more tables, filing cabinets, curtains, a rug, stuff on the walls...), but it's my favorite room in the house so far. I often find myself staring at the room from other rooms.. I just love it, especially in the morning! I didn't get a chance to clean the fireplace yet (there's a lot of smoke damage, and about $10 in pennies, inside the fireplace), but just the trim being repainted makes it looks so much cleaner and fresh.
Subscribe to:
Posts (Atom)