Things wouldn't be right in our world if everything went smoothly and according to plan. I should have known not to get to excited about the fact that we had finally ordered our floor.
Three days after we ordered and paid for the floor, I got a call from the salesman (when I saw his number on the caller ID I got excited, thinking, stupidly, that maybe the floor came in early!).. Turns out the floor we ordered (and loved) is an older type of floating floor. The type you need to glue. I told him that I'd talk to R and see what we wanted to do. After a lot of emails, phone calls, and research, we cancelled the order. Turns out that this type of installation takes a lot longer, is extremely messy and has a lot of room for error. Not something we want to attempt. So we're back to square one.
Last Thursday we went to the showroom to look at some new samples. I think we took home about 30 samples. They all looked horrible, except for one. It's another hickory floor, but it doesn't have the distressed, vintage look that the first one did. But it doesn't need to be glued. And it does match the Dining Room floor. R isn't completely sold on it and I'm wondering if I just like it because I want a floor. We need to make a decision soon though because we need to get it ordered and installed soon because half of the finish work left to do in the Kitchen can't happen until the floor is in.
R's sister had a good idea this weekend. What if we paid someone to install the floor, rather than do it ourselves. While this is exactly what we didn't want to do (for many reasons), it would let us get the floor we actually love, and not have to settle for another one just because it's easier and cleaner. So we're still in discussion mode on this one... it'll be more money and we won't be able to say "we did that!". What do you think? Would it be worth it? Or should we just order the other hickory floor?

Showing posts with label money. Show all posts
Showing posts with label money. Show all posts
Tuesday, October 4, 2011
Friday, April 29, 2011
Mirror Refurbished
The previous owner left the mirror in the upstairs bathroom. It was old and ugly.. stained brown, with the wood chipping and peeling from being in the bathroom for so long. And the back was covered in paper, which was disintegrating. But, we needed a mirror in there.
I found one at Ikea that I liked and that matched the glass shelf and candle holders in the bathroom (the picture is the shelf, not the mirror... apparently they discontinued the mirror. It was only $20 though). However, when we were actually in the store, R hated it. Not sure why. He just did. So I didn't buy it. That was months ago. The mirror had been taken off the wall when I was painting and rather than hang it back up (and resign to the fact that it was staying), we had it propped up on the counter.
 Back in December I tried painting it white, just to see what it would look like. With a coat of primer and a coat of paint, the stain still bled through. And you could see the cracking. It looked horrible. So now rather than just an ugly mirror, we have an ugly mirror that is half painted white.
 Finally I had had enough of it. The rest of the bathroom is done except for the stupid mirror. I took it outside, put newspaper and painters tape over the glass and spray painted it black. And I have to say, I love how it came out! It looks almost identical to the Hemnes mirror from Ikea, which I liked, but was $50.


I found one at Ikea that I liked and that matched the glass shelf and candle holders in the bathroom (the picture is the shelf, not the mirror... apparently they discontinued the mirror. It was only $20 though). However, when we were actually in the store, R hated it. Not sure why. He just did. So I didn't buy it. That was months ago. The mirror had been taken off the wall when I was painting and rather than hang it back up (and resign to the fact that it was staying), we had it propped up on the counter.
Monday, April 11, 2011
Finished Laundry Room

Washer - $0 (given to me by a former client)
Dryer - $0 (given to me by a former client)
Wall Paint - $2.50 (the other half of the paint will be used in the upstairs Hall)
Dryer - $0 (given to me by a former client)
Wall Paint - $2.50 (the other half of the paint will be used in the upstairs Hall)
White Paint - $0 (I had some leftover from other rooms)
Cabinet Knobs - $3
Cabinet Knobs - $3
Rug - $0 (was in our Master Bathroom in our apartment, but didn't fit in this bathroom)
Iron/Ironing Board Holder - $0 (I bought this about 3 years ago and we never got around to hanging it up in our apartment. I love having somewhere to put the ironing board and iron now.. they always seemed to get in the way!)
Yup. A $5.50 complete room transformation. The new cabinet knobs match the ones in the bathroom (because the cabinets also match). The washer and dryer were very generously given to us by clients of mine. We were remodeling their house and part of the remodel involved relocating their washer/dryer to the finished basement (as opposed to in the middle of the Kitchen where they had been). But to conserve space, we decided to go with a stack-able unit. Which meant that they had no use for their old washer and dryer. When they heard that we finally closed on the house, they asked if we needed a washer and dryer. At the time, we were just going to use my parent's or the ones in the basement. But who could pass up free appliances! And ones that were only a couple years old? The only catch was that we had to pick them up that weekend because demolition was starting Monday. More good luck... we already had the UHaul reserved to move out of our apartment. So all we had to do was make a quick trip down to Deep River to get them!
The wall cabinet is a huge help. It has three shelves, so I'm able to store household essentials and additional cleaning supplies in there. There's room for all of our backup laundry detergent and fabric softener, dusting supplies, Febreze, lightbulbs, laundry supplies, etc. If you know me, you know I have a lot of cleaning supplies... And they all fit in here!

Wednesday, February 2, 2011
The Importance of an Organized Cabinet
I adore my pots and pans.. they were a wedding present from my uncle and since we cook for ourselves basically every single day, we've gotten a lot of use out of them in the past 3 years. However, they're starting to show their age. In our apartment, we had a large cabinet next to the range which is where I stored all of the pots, pans and baking pans. They were organized for about 1 day, then for the next two years were just thrown in there, with a prayer, hoping they'd stay in there and not fall out onto the tile floor and break. The same has been the case at the new house. Only here, we have a half floor, and what's remaining of it is nasty beyond all belief, so if one of my precious pans fell on that floor I'd be scrubbing the crap out of it for weeks before I'd use it again.
 Enter the Rev-A-Shelf 2-Tier Cookware Organizer. I found this little piece of heaven months ago in Lowe's, but was immediately scared by the price tag. With tax, we were looking at about $97 and change. Eek. With a whole house to remodel there was no way I could justify that purchase. Right? But then between Christmas and our birthdays, we received a large amount of Lowe's gift cards (how'd you guys know?). So on a snowy afternoon last week I finally got my organizer (my smart husband instantly recognized my snowed-in cabin fever and set out to Lowe's to get this to keep me busy).
It wasn't very hard to install. My only complaint was that the first instruction was to dismantle the pull out trays, and the things were impossible to get apart (and were drenched in grease which got everywhere). Other than that, it went together without any problems. I immediately got all of my pans and lids in their new homes and basked in the greatness that is an organized cabinet and an empty warming drawer (where I had been storing all of the glass lids so they wouldn't break) that I can now use.
The ingenious thing about this is that it not only has pull out shelves, but it also has a spot for the lids, which I've noticed, most pan organizers don't. They focus on the pans themselves, but for me, it's always been the lids that are the biggest trouble makers. They don't stack nicely. I'm afraid they're going to break. Also, on the bottom shelf are 5 adjustable place holders for the pans. They can be removed or pushed over to accommodate any size pot or pan. This organizer that I bought is made for a 12" cabinet, but I have an 18" cabinet, which left just enough space on the side for pizza pans and cookie sheets. Once again leaving my beautiful warming drawer empty and ready for use!


Wednesday, January 5, 2011
Kitchen Cabinet Hardware
Like lighting, choosing cabinet hardware could take years. There are so many companies out there, so many designs, finishes, price ranges... it's overwhelming!

We've been living with "contractor hardware" in our Kitchen for 3 months now (well, for the first month and a half there was nothing at all and you'd scrape up your fingers just trying to get a cabinet open. But almost every time R opens a cabinet he manages to rip the tape and break it.. So they're not really as strong as they used to be (he definitely does not have a gentle touch!). So I was tasked with the job of FINALLY finding us some cabinet hardware. The reason it kept getting put off was because every time I was in Lowe's or Home Depot I'd check out their selection, and never liked anything. I know I want oil-rubbed bronze to match everything else in the house, and Lowe's and HD would have maybe one option. Add to that that I wanted cup pulls for the drawers, and you're really narrowing down your cheap box store options. Whenever I'd look online I'd find tons of beautiful options (think Pottery Barn, Restoration Hardware...), but for those beauties you're paying $15 a knob. Totally not in our budget.
But now I was down to the wire. We're having a party in about a week and a half, and while it is obvious the house is no where near being done, for some reason we both feel like we NEED that hardware before the party. It had to happen. So I went on amazon.com and decided to just go with the first 4 options I found and choose one. I got lucky.
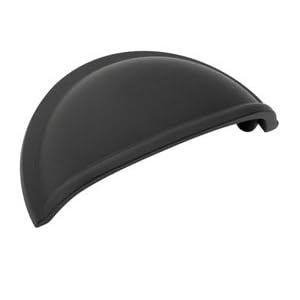
I found these cup pulls by Amerock.
Love love love! They're exactly what I wanted... traditional, but not too glopped up with extra lines and details. They don't come in ORB, just a matte black finish, which is okay, because all of the ORB options I found on amazon were too bronze... wouldn't match the faucet and door latches. Amazon Price? $2.18 each. A STEAL! That's even cheaper than the ugly ones I was finding in HD and Lowe's!
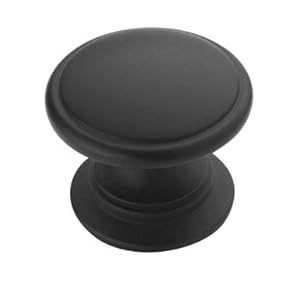
The wonderfulness that is amazon provided me with some complementary hardware.. and the knob they suggested is gorgeous!
Also by Amerock, this knob costs a whopping $1.75. I think we can afford that!
I was shocked at how lucky I was... I guess it's a little early birthday luck sneaking up on me! I figured out how many knobs and pulls I needed (16 knobs, 7 pulls), and dumped everything in my shopping cart, entered in my info, and was presented with the final screen.
Total Purchase: $43.26
Total Shipping: $67.83
Total: $111.09
Whhhaaaaattt?!?! My shipping is almost DOUBLE the price of the knobs? For shipping tiny little knobs that weigh what a half a pound each?!?!? Unacceptable. I was so happy with my $43.26, but I just could not justify $68 for shipping these tiny things.
So I did what every good internet shopper does... I took the model numbers and did a google search. That's when I found hardware heaven. www.usknobs.com They're a site that claims "warehouse direct prices"... and I tell ya... they're amazing. I found my cup pulls and knobs, FOR CHEAPER THAN AMAZON, and was a happy girl. My final price on usknobs.com, including shipping? $44.77. Heaven :) Oh, and did I mention that they not only shipped today, about 2 hours after my order was submitted, but according to the tracking number they'll be here Friday morning?
Kitchen Hardware Specifics:
Manufacturer: Amerock
Retailer: www.usknobs.com
Model: Allison Metal Finishes Cup Pull (Model BP53010-FB)
Finish: Flat Black
Price: $1.96 each
Manufacturer: Amerock
Retailer: www.usknobs.com
Model: Allison Black 1 1/4" FLT Traditional Knob (Model BP53012-FB)
Finish: Flat Black
Price: $1.22 each
Monday, November 15, 2010
The House Without Heat
Yes. You read that correct. We have been living in a house that doesn't have heat. But we knew this before buying the house. The existing furnace is... WAS.... about 60 years old. During our home inspection the inspector got it to turn on, but it wasn't circulating any hot water. He left the furnace on for about a hour and a half, but not one radiator felt warm. So we had a mechanical engineer come in and take a look at it, and then give us a quote to replace it. Turns out that the circulator was broken and therefore not circulating the hot water. Makes sense, right? Apparently this was something that could be fixed for approximately $500, but the furnace is 60 years old. And didn't appear to be in good shape. It needed to be replaced. So we asked for money off of the asking price for it, and were given it.
Fast forward to October. We are now living in the house full time. It's cold, but not unbearable yet. In September a neighbor of my parents emailed me to tell me about an interest free loan offered by the state for emergency repairs/replacements of heating systems. And we qualify for it. So R began the long process of applying (it was basically like applying for a mortgage again, only this time we kept having to go get stuff notarized). Meanwhile we're wearing 3 sweatshirts and a couple pairs of socks to bed, sleeping underneath 6 thick blankets. It was actually kind of fun... if you ignore the fact that most nights I couldn't feel my fingers. I was worried about Madison being in the house all day... but she also had about 6 blankets in her crate, plus 2 very thick blankets covering the crate, insulating her. And every day when I got home from work I'd check her to make sure she wasn't cold. At least once or twice a week my parents would call to make sure we weren't too cold (though I think they just wanted Madison! :) ). Clients of mine would also call frequently asking if we were too cold. I felt very loved.
Finally the first week of November we were approved for the loan ($6,000) plus an extra $1,200 to replace three radiators (the large one in the Kitchen, the smaller one we removed in the Kitchen to put in cabinets, and the one in my Office that didn't work and just leaked all over the floor even though it was disconnected). All in all $7,200 isn't that much money, but with this interest free loan it's only going to be $30 a month. I like that!
The oil company reserves Mondays for emergency cases.. which we were. They scheduled us for Monday November 15th and Tuesday November 16th. They worked very fast and efficiently... arriving at about 7:30 am on the 15th and were completely done with everything by 5 pm that night. Very impressive! Especially seeing as the big radiator in the Kitchen weighed over 500 pounds!
Pictures to come tomorrow! Right now we're just enjoying our heat!!
Sunday, September 5, 2010
Kitchen Demolition
Today with the help of my dad and uncle, we demolished our Kitchen. It felt great! I tell ya... if you're ever having a bad day and need to let off some steam, pick up a crowbar and tear down drywall! Great stress reliever! My uncle brought his saws-all and went a little crazy on the cabinets, so we had the nastiness out of the house in about an hour!

Of course, we found a couple unexpected things. The first being the open electrical box that was behind the dishwasher, with live wires sticking out of it. Lovely. Luckily we have an electrician coming in this week, so he'll take care of that for us. The dishwasher wasn't even hooked up to that.. it was hardwired through the floor (as was the stove). Again, it'll all be taken care of, thank God. Electrical stuff scares me.
Another minor problem we found was the floor beneath the sink cabinet. Not only was it disgusting and filled with dirt, acorns, toys, food wrappers, bottle caps, and BONES (mice and other larger somethings...), but the plywood was completely rotted. So we made our first Lowe's trip of the day and got some new plywood.


Next came tearing down the drywall. My dad kept trying to talk me out of it, but I'm glad I insisted on tearing it down. In all of the other rooms we've been leaving the plaster and/or drywall and just painting over it for now, due to our tight moving-in schedule. But in the Kitchen, the wallpaper was fused to the drywall and would not come off. No matter what we tried. And it was old and yucky, and I'm sorry, but Kitchens need to be clean (ok, according to me, everything needs to be clean, but Kitchens especially). There isn't a ton of drywall in the Kitchen because there are so many openings and the huge fireplace, so it wouldn't be that bad. As soon as all of the drywall was down and out of the house, everyone agreed with me. The horrible smell that had been in the Kitchen was now completely gone. The smell was probably a mixture of moldy drywall, mouse poop in the cabinets and the rotten floor. All of which are now in the backyard in a portable dumpster. And we got the pleasure of seeing what the walls in the Kitchen used to look like.... very very wide, very very detailed wood panels. Yet more proof of the Wilcox's wealth.

 |
| Old wallpaper, also showing where the original wall was (the back half of the house was originally split up into three rooms). |
 |
| My backyard |
And this is when we hit the major snag of the day. Electrical outlets. There weren't enough in the Kitchen, both for code requirements and for S's small appliance requirements. So we had to call an electrician to run some new wires for a bunch of new GFCI outlets as well as outlets for the dishwasher, microwave/hood and stove. And why not throw in some new wall switches while we're at it. So here's the problem. It's the Saturday of Labor Day weekend. We're not going to get anyone in this weekend. So this ruins our plans. We had 3 days straight to work on the Kitchen and get it done, but now we have nothing we can do. We can't move forward with anything until the electrical is done (No drywall, no floor, no cabinets, no paint, no trim, etc, etc, etc).
So, you ask, what did we do? We found stuff to do (not hard to do in a 239 year old house). Today we decided to replace the one old window in the house. It was left, most likely, because it was a taller window, and the Kitchen cabinets had been installed right in front of it. Turns out, it was also open, letting in more smells and mice. Woohoo. Enter Lowe's trip #2 of the day. My dad and I went in search of a matching window, but in a shorter size, so that it would fit above the base cabinets. All we could find in that size were windows without an mullions, or with a 4/4 grid. I can't do that when the rest of the windows are 6/6 and it would be very very obvious if this one was different. So I set off wandering around the store looking for someone to help me (which never happened... one guy said the window guy was on his lunch break, and he'd send someone else over to help. No one ever showed up). On my way back to my dad I noticed a window on a cart in the back of the store. No label, but it appeared to be the correct size. After arguing over the windows some more, we decided to go look at doors instead (to replace the back door that is impossible to open). Now my dad sees the window, and discovers a tiny price tag on the top. It was a special order that was returned. Originally $239... we get it for $50! Now that's a great deal!
 |
| Before |
 |
| After |
 |
| The Kitchen at the end of the day |
Subscribe to:
Posts (Atom)