Friday, February 4, 2011

Beadboard Backsplash

I love love love beadboard. I love it on the wall, on the ceiling, on cabinets, as wainscot, as a backsplash, in Kitchens, in Bathrooms, on porches. Think Country Beautiful or the Pottery Barn catalog.Luckily I have a house that fits well with the beadboard style. When we moved in, we only had one area with beadboard.. the front porch ceiling (which will be repainted and beautified this spring). We had some wood paneling wainscoting in the Kitchen and also some matching wide paneling in the built-in hutch, but that's it. 
In 2009 we renovated a Kitchen as part of a work project.  We decided to install a beadboard backsplash, with 2 1/2" wide v-groove boards painted the wall color, with a simple 3" base molding.  It looked gorgeous! 
When designing my own Kitchen a year later, I knew that tile just wouldn't work. As much as I like tile (and know a good tile installer aka my uncle), it just didn't seem right for a 240 year old house. The beadboard would give the kitchen a more country farmhouse look, which is what we were going for.
So now it was down to whether to use beadboard panels, or use the real thing. I voted for the panels (less seams, less nails, and a more consistent look. Plus we'd be able to use mdf which would stand up to cleaning better). R, the beadboard installer, wanted to use wood panels, which were 2 beadboards (is that the correct terminology?) wide. They were tongue and groove and relatively easy to install. Since he was the installer, he won this argument (though I still wish we went with mdf). The beadboard looks great, but I do have a couple complaints. Because they were pine panels, they took a ton of coats of paint to cover the wood grain and knots (there were a lot). We also wasted a lot of pieces because there were knots in less than ideal spots (such as right on the edge, or huge knot holes in the middle of a board). Now that they're painted, from afar you don't notice these imperfections. However, they are very rough to the touch, and I worry that they will not do as well over a couple years of use and cleaning (especially since they're right behind my sink). But oh well. This isn't our permanent Kitchen in the house.. it's more of a temporary kitchen to get us through the years until we can afford the addition.
For the base, we decided to use a mdf trim piece we found at Lowe's. Initially, R wanted to use wood (again). But I put the piece of wood behind the sink for a couple days (just to see how it would look), and after about 2 days all of the paint was peeling off and it was basically ruined (so we can't even return it). Luckily Lowe's carried the exact same trim in mdf, which has been installed for about 2 months now and still looks great. I suppose if I had to have one piece not be wood I'd prefer it to be the base trim... this will be getting wetter than the beadboard ever will.
We still have some upper trim to install (very small 1/2" mdf trim, just to cover the seam between the boards and the underside of the cabinets). Once that is installed we can do one final coat of paint over everything, caulk a couple seams and then install my over the sink light (I've been waiting to do this so it doesn't get scratched or broken when the trim/boards were being installed/painted).

Wednesday, February 2, 2011

The Importance of an Organized Cabinet

I adore my pots and pans.. they were a wedding present from my uncle and since we cook for ourselves basically every single day, we've gotten a lot of use out of them in the past 3 years. However, they're starting to show their age. In our apartment, we had a large cabinet next to the range which is where I stored all of the pots, pans and baking pans. They were organized for about 1 day, then for the next two years were just thrown in there, with a prayer, hoping they'd stay in there and not fall out onto the tile floor and break. The same has been the case at the new house. Only here, we have a half floor, and what's remaining of it is nasty beyond all belief, so if one of my precious pans fell on that floor I'd be scrubbing the crap out of it for weeks before I'd use it again.
Enter the Rev-A-Shelf 2-Tier Cookware Organizer. I found this little piece of heaven months ago in Lowe's, but was immediately scared by the price tag. With tax, we were looking at about $97 and change. Eek. With a whole house to remodel there was no way I could justify that purchase. Right? But then between Christmas and our birthdays, we received a large amount of Lowe's gift cards (how'd you guys know?). So on a snowy afternoon last week I finally got my organizer (my smart husband instantly recognized my snowed-in cabin fever and set out to Lowe's to get this to keep me busy).

It wasn't very hard to install. My only complaint was that the first instruction was to dismantle the pull out trays, and the things were impossible to get apart (and were drenched in grease which got everywhere). Other than that, it went together without any problems. I immediately got all of my pans and lids in their new homes and basked in the greatness that is an organized cabinet and an empty warming drawer (where I had been storing all of the glass lids so they wouldn't break) that I can now use.

The ingenious thing about this is that it not only has pull out shelves, but it also has a spot for the lids, which I've noticed, most pan organizers don't. They focus on the pans themselves, but for me, it's always been the lids that are the biggest trouble makers. They don't stack nicely. I'm afraid they're going to break. Also, on the bottom shelf are 5 adjustable place holders for the pans. They can be removed or pushed over to accommodate any size pot or pan. This organizer that I bought is made for a 12" cabinet, but I have an 18" cabinet, which left just enough space on the side for pizza pans and cookie sheets. Once again leaving my beautiful warming drawer empty and ready for use!

Tuesday, January 25, 2011

On the Fence

Picket Fence Blogs. This is a great site for finding new blogs to read... home renovation related and others. Please take the time to click the On the Fence link in the right column and vote for my blog! Thanks!!

Sunday, January 23, 2011

Kitchen Cabinet Hardware Installed

Today's biggest goal was to install the Kitchen cabinet hardware. While on a job site last week, I was talking to one of the cabinet installers and he gave me a tip on installing cabinet hardware. He always puts a piece of painter's tape on the cabinet, then measures center/hole lines on that, and drills right through the tape. That way you're not marking up the cabinet, and it's easy to change your mind (for example, for the larger drawers, I first measured for the pulls to be located dead center on the drawer, then we decided they looked better toward the top, so it was easy to change, and we didn't have to worry about cleaning up the old markings). We installed all of the pulls on the top drawers exactly centered, both vertically and horizontally. For the two larger drawers, we located the pulls centered horizontally, and the same distance from the top as the upper drawers. We not only liked the look better, but it'll be more functional.
And here are the same drawers with the new pulls. We also added two pulls to the fake panel in front of the sink. While installing them, R discovered that the panel pops off... which made me excited because that'll make it really easy to turn that useless panel into a handy flip-down drawer for sponges, etc.
I also decided to work on our bedroom door. The whole back hallway will be redone this year... new drywall, ceilings, etc., which will get done at the same time as the stairs and pantry. But I figured that for the time being I could get started on some of the dirty work... such as scraping the paint off of the doors. For Christmas I got a fancy paint scraper... It is good for scraping paint off of anything.. including paint rollers (the curved part of the scraper).
It did a great job! I had tried putty knives, spray paint removers, and a couple other types of scrapers with little lucky. Within an hour I had the door going from to this 
It may not seem like much, but it made a huge difference! I also scraped a bunch of paint off of this door's casing. I figure if I can get the doors in this hall (there are 2 of them) scraped now, then by the time it's warm out (will that ever happen? It's -2 degrees out right now..) I'll be able to take them outside to sand and paint.

Monday, January 17, 2011

Secrets

A 240 year old house is bound to have a lot of secrets. Unfortunately the house was completely renovated in the mid 1950's, so I feel like any cool "treasures" were found then, when a lot of the walls were ripped down and replaced. If we ever tear up any of the floors, we'll probably find fun stuff, but it's not something we're planning on doing anytime soon.


But the house still gives us some hints about some of it's secrets. For example, when we had our house inspection, R discovered a hidden fireplace in the Master Bedroom. Once we found that fireplace (which is hidden behind cabinetry), we concluded that there must be one in the other front bedroom, and it's just been drywalled over for some reason.


Well, we were wrong.


Last weekend R was putting some Christmas boxes in the attic for me and got distracted. He ended up on the floor, pulling up floor boards, and sticking his head down in the hole, to see what was behind that bedroom wall. Turns out there isn't a fireplace there. Just a big open space where a fireplace should be. The next day we were in the Dining Room and  I realized that there was an outline of a square on the ceiling, in what looked like the same spot as the patched floor in the bedroom, and roughly the same size. R came up with the idea that maybe there was once a vent there that allowed heat from the large Dining Room fireplace to spread easily into the bedroom, heating it because it didn't have a fireplace.


Which makes sense. What doesn't make sense is why there isn't a fireplace in that room. It's common in this type of house for there to be a fireplace off each side of the chimney. It's what made sense, and what was necessary to heat the rooms. I find it hard to believe that this room had  no heat source until the early 1900's or so when the radiators were put in. And the heat vent that R mentioned made sense in the 1800's, but not when the house was built.

So I've come to this conclusion. At one time, early in the house's life, there was a fireplace in this room. At some time (my guess is in the 1860's when the Mildrums moved in) the fireplace was removed and the vent between the Dining Room and Bedroom was installed. And I think this was done to create that big open space behind the wall. It took me some time to come to this conclusion.. it didn't hit me until later this week when R unstuck the cabinet door in our bedroom that conceals our fireplace (it had been painted shut). When he did that, we were able to see a "passageway" that went between the walls of the bedroom closets and the chimney. I had always wondered why the fireplace wasn't centered in the cabinet opening. I now believe that the cabinet was built off center to allow access to this passageway. If someone was skinny enough, they could squeeze sideways through the passageway into the larger open space on the other side of the chimney. The open space could easily fit a bunch of people, completely concealed from the outside world. Which completely corroborates what our neighbors told us about our house being part of the Underground Railroad. I just have to get up my courage to squeeze into the passageway (ee... mice... spiders...claustrophobia) and get to the other side of the chimney to see if there's anything cool back there!

Monday, January 10, 2011

Our Plans for 2011

We have huge plans for 2011 when it comes to the house. Hopefully as soon as we thaw out from underneath all of the snow (currently over 2 feet, with more on the way tomorrow) we'll get some work done on the exterior of the house as well as some landscaping.


Here are some of our other planned projects for 2011..
  • Finish the Kitchen!! Top priority! This includes finishing the window/door casing/trim, priming and painting the walls and trim, installing base trim, installing the soffit above the cabinets and crown molding, buying/installing the dishwasher, building end pieces to finish off the base cabinets, building cabinets around the fridge, painting the fireplace, painting the ceiling, and most importantly... installing the floor (which may now include ripping up the existing plywood and installing new, thinner plywood)!
  • Landscaping the front yard. Last fall we cut back the front bushes so they weren't blocking the windows, but I think that we'll be taking them out completely and planting some new bushes and flowers. We also need to clean up the stone wall and the planter around the tree by the driveway.
  • Cleaning up the front entrance/porch. This will include repainting the beadboard, installing a new light fixture, and installing new wood/pvc columns in place of the metal columns. A later project will be putting stone over the concrete steps and putting in a new walkway, but that probably won't be in 2011.
  • Finally get all the rest of our boxes out of my parent's attic and basement. It'll be nice to finally be able to organize everything in one place. Lucky for us we have a huge, empty attic!
  • Buy chickens and build a coop.
  • Fence in the backyard.
  • Install the new exterior light fixtures next to the back door.
  • Install the new motion detecting flood light by the garage.
  • Renovate the downstairs bathroom. This will include re-framing the room to make it smaller (yes, I said smaller), demo'ing everything (sink, toilet, drywall) and installing a new sink, toilet and possibly a corner shower. I'd also like to clean up the radiator in this room.. maybe by re-painting, or if we find a nice "new" radiator to install in it's place. I think I'd like to keep the wood floor in this room.. so maybe refinishing it and staining it (it's currently painted white-ish).
  • Re-work/re-build the back staircase. The stairs aren't very safe right now.. they're too small, so hopefully we will be able to re-work them using the small space available. I have a feeling we'll just be rebuilding new stairs in the exact same locations. We also will need to install a new handrail and take down all of the plaster and trim in the staircase and re-do it all. Plus paint!
  • Finish off the closet under the back staircase and install some shelving. I think this will be my utility closet, with room for the vacuum, broom and mops. Half will have shelves for cleaning supplies, since I think I'll be going with a pedestal sink in the downstairs bathroom and there isn't anywhere else downstairs to keep cleaning supplies. The thing I'm looking forward to the most is finally having a home for my beautiful Dyson. As much as I love looking at it, we've never had a utility closet to put it away in.
  • Figure out what I want to do with my pantry. I'm currently planning on using the whole lean-to and half of the downstairs bathroom (that's why I'm making it smaller.. I'll be "stealing" the part where the closet, toilet and tub are now). This will be tied in with the stair re-build, because that's how the pantry will be accessed. The whole remodel may involve reworking the roof, adding insulation, a new door, new windows, shelving, a floor, drywall, cabinets, etc. I have a beautiful plan for the room, I just hope it all works out! I really need the storage!!
  • Install shelving in the Living Room closet and make it into a game/puzzle closet.
  • Figure out lighting solutions for the Living Room.. it's way too dark in there.
  • Strip the paint off of the doors, casing, trim and fireplace in the Living Room and repaint. 
  • Demo the ceiling in the front Hall, take down the wallpaper and repaint. Also remove the carpeting on the stairs and at the top of the stairs and buy a stair runner, and matching runners for the upstairs and downstairs hall/entry. Also replace the light in the front Entry, and install a new light at the top of the stairs.
  • Install a chandelier in the Dining Room (this we won't be able to do ourselves because we'll need to not only run wiring through the ceiling and beam, but we'd also need a switch. There currently isn't much electrical in the Dining Room).
  • Get a Dining Room table. R is still saying he'll make one for me... but we'll need to get some of his woodworking tools down here first.
  • Organize tools/etc. in the basement.
  • Buy bookcases, another desk and filing cabinets for my office and finally unpack everything! I also need to make/paint my new bulletin boards, and hang things on the walls!
  • Put a second coat of paint on the Guest Room walls, and paint the trim.
  • Paint the trim and walls in the Twilight Room (though this is the room that R is currently using for his office and he's probably fine with it the way it is now... we'll see how long it takes before it bothers me!).
  • Completely demo and re-work the upstairs back hall. A ton of the plaster has already fallen off of the walls and ceiling, so it all needs to come down and be re-drywalled. All of the doors also need to be scraped, stripped and repainted. The floors need to be refinished. I need to pick a paint color. This will probably be done at the same time as the stairs and pantry, since the stairs open up to the hall and it's not a very big space. We'll also be replacing the light fixture at the top of the stairs.
  • Figure out a lighting solution for the upstairs bathroom and laundry.
  • Clean out the laundry cabinetry and make the space more usable. Also add a permanent dryer vent so we don't need to open the window every time we use the dryer.


    I'm sure there are a million other little projects, and of course lots of interior decorating, to be done in the upcoming year! I'm sure 2011 will be filled with a lot of sweat-equity, shopping, hard-work, and room reveals :)


    What are some of the projects you have planned for 2011?

    Wednesday, January 5, 2011

    Kitchen Cabinet Hardware

    Like lighting, choosing cabinet hardware could take years. There are so many companies out there, so many designs, finishes, price ranges... it's overwhelming!
    We've been living with "contractor hardware" in our Kitchen for 3 months now (well, for the first month and a half there was nothing at all and you'd scrape up your fingers just trying to get a cabinet open. But almost every time R opens a cabinet he manages to rip the tape and break it.. So they're not really as strong as they used to be (he definitely does not have a gentle touch!). So I was tasked with the job of FINALLY finding us some cabinet hardware. The reason it kept getting put off was because every time I was in Lowe's or Home Depot I'd check out their selection, and never liked anything. I know I want oil-rubbed bronze to match everything else in the house, and Lowe's and HD would have maybe one option. Add to that that I wanted cup pulls for the drawers, and you're really narrowing down your cheap box store options. Whenever I'd look online I'd find tons of beautiful options (think Pottery Barn, Restoration Hardware...), but for those beauties you're paying $15 a knob. Totally not in our budget.

    But now I was down to the wire. We're having a party in about a week and a half, and while it is obvious the house is no where near being done, for some reason we both feel like we NEED that hardware before the party. It had to happen. So I went on amazon.com and decided to just go with the first 4 options I found and choose one. I got lucky.

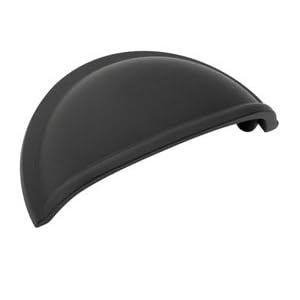
    I found these cup pulls by Amerock.
    Love love love! They're exactly what I wanted... traditional, but not too glopped up with extra lines and details. They don't come in ORB, just a matte black finish, which is okay, because all of the ORB options I found on amazon were too bronze... wouldn't match the faucet and door latches. Amazon Price? $2.18 each. A STEAL! That's even cheaper than the ugly ones I was finding in HD and Lowe's!

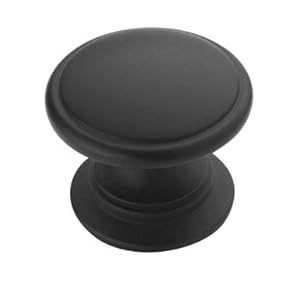
    The wonderfulness that is amazon provided me with some complementary hardware.. and the knob they suggested is gorgeous!
    Also by Amerock, this knob costs a whopping $1.75. I think we can afford that! 

    I was shocked at how lucky I was... I guess it's a little early birthday luck sneaking up on me! I figured out how many knobs and pulls I needed (16 knobs, 7 pulls), and dumped everything in my shopping cart, entered in my info, and was presented with the final screen. 

    Total Purchase: $43.26
    Total Shipping: $67.83
    Total: $111.09

    Whhhaaaaattt?!?! My shipping is almost DOUBLE the price of the knobs? For shipping tiny little knobs that weigh what a half a pound each?!?!? Unacceptable. I was so happy with my $43.26, but I just could not justify $68 for shipping these tiny things.

    So I did what every good internet shopper does... I took the model numbers and did a google search. That's when I found hardware heaven. www.usknobs.com They're a site that claims "warehouse direct prices"... and I tell ya... they're amazing. I found my cup pulls and knobs, FOR CHEAPER THAN AMAZON, and was a happy girl. My final price on usknobs.com, including shipping? $44.77. Heaven :) Oh, and did I mention that they not only shipped today, about 2 hours after my order was submitted, but according to the tracking number they'll be here Friday morning?

    Kitchen Hardware Specifics:

    Manufacturer: Amerock
    Retailer: www.usknobs.com
    Model: Allison Metal Finishes Cup Pull (Model BP53010-FB)
    Finish: Flat Black
    Price: $1.96 each


    Manufacturer: Amerock
    Retailer: www.usknobs.com
    Model: Allison Black 1 1/4" FLT Traditional Knob (Model BP53012-FB)
    Finish: Flat Black
    Price: $1.22 each

    Monday, December 27, 2010

    Tearin' Up My... Floor

    One of our Christmas gifts from my mom is an oscillating tool to tear up the remaining linoleum in the Kitchen. It's a small electrical tool with different attachments for things such as cutting wood floors, tearing up vinyl/linoleum, and sanding. The one we were interested in is about 3" wide, and slightly curved. When turned on, it vibrates back and forth, pulling up the linoleum.
    It works like magic! This is the floor that I spent two full days on over the summer. I was sweating like crazy, working as hard as I could, and after two days I got up about 6 square feet of the stuff... and that was only the top layer! The adhesive was still stuck to the plywood in most places! And since then, we've been living with a disgusting floor that is two different kinds of linoleum, plywood, and nasty white-ish adhesive.


    I spent about 5 hours today using our new magical tool. I kept having to take breaks though because it is extremely loud (making my ears right) and vibrates a lot (my hands were shaking). But I got up all of the leftover adhesive in front of the fireplace, plus most of the linoleum and adhesive in front of the windows, hutch and stairs. I was so proud of myself! As tired as I am, I can't wait to get back at it tomorrow! Despite the horrible aches and pains I have from having to crouch on the floor for 5 hours..

    Sunday, December 26, 2010

    Getting back to work..

    Due to Christmas, we haven't been getting much work done in the house lately. Which is a little disappointing. But we're too busy, and family comes first.

    Thanks to a beautiful blizzard (our first in the house) this weekend, and Christmas being over, we did get some work done, finally! Today I did some more unpacking in the Kitchen and Living Room, and Ryan installed the new knobs on our bedroom built in cabinetry. We also decided to re-use the existing cabinet "locks" (basically just a small piece of hardware that flips over to keep the cabinet doors shut). We were both a little concerned about the doors (especially the ones in front of the fireplace) opening. So we decided that we'd just spray paint them to match the new knobs. That was when we discovered this on the back:
    February 27, 1843
    While unpacking more Kitchen stuff (I seriously think I own every single Kitchen item ever made!), I also cleaned up a bit. Because we've been so busy, I never really cleaned the countertops up after R was working on the beadboard 2 weeks ago. So I cleaned up all of the dust and tools he left behind, and unpacked some of my countertop items (spice rack, knives, utensil holder, etc). It actually looks like a real Kitchen now! Who knew that all it took was a spice rack!

    Saturday, December 11, 2010

    Kitchen Built-in Hutch

    This week my goal was to finish this hutch. I realized that I have about 10 boxes of Kitchen stuff that I can unpack into this hutch. I also have a ton of Christmas stuff that I want to put up here. So starting on Sunday, I've spent every available second sanding, priming, and painting.
    The hutch was originally stained, so I used a couple coats of Kilz 2 to cover it, then 2 coats of white paint. I hadn't realized before, but the cabinet goes up all the way to the ceiling... even though the trim is about 12" below the ceiling. It was pretty difficult to get up in that space. But I also realized that it would be the perfect spot for some lighting to illuminate the whole hutch. Someday..

    I originally wanted to replace the wood paneling in the back of the cabinet with beadboard to match the backsplash, but now that it's painted, you don't notice it as much. It actually looks pretty nice. And luckily for me, the doors and shelves all came out very easily, so it made everything a little bit easier to paint.

    We decided to keep the original hardware. It's very unique, and I think it fits better with the house than anything else we'd find. But when I went to put it back on the newly painted cabinet, I realized it needed some help. When a very thorough cleaning didn't make much improvement, I decided to spray paint them. I painted them black and they look brand new!

    I love how it all came out! Now we just need to get the rest of the trim/casing and walls painted in the Kitchen... As beautiful as the hutch looks, it's a little out of place in the rest of the construction zone that is my Kitchen :)

    Monday, December 6, 2010

    Our House's "First" Christmas Tree

    Ok ok... It's not the house's "First" tree... the house has most likely had more than a couple Christmas trees... but it's the house's first tree with us!


    We have what we think is a large Living Room, but unfortunately, it's all filled up with furniture, windows and doors. So where would one put a Christmas tree? We had plenty of room for it in the Kitchen or Dining Room, but we wanted it to be somewhere where we'd get to really enjoy it. So that means we had to be able to see it from the Living Room. It was either move furniture around, or put it in front of the already blocked off fireplace. Fireplace it is.
    Us with the tree, freshly cut
    We have a very heavy duty tree stand (I've had way too many ornaments broken by falling trees in the past... this isn't something we do lightly!), so we weren't too concerned about the tree falling. It was gonna hold up the tree. Well, that in addition to the huge piece of plywood and half a bag of shims. The back of the hearth is raised up from the floor (which is at a huge angle at this part of the room) a couple inches. It looks hilarious... luckily my mom had our tree skirt pieced enough for us to use. The plywood was really tacky looking (you can see it in this picture a little bit)!

    Wednesday, December 1, 2010

    Kitchen Fireplace

    Most design decisions for the house have come to me pretty easily. However, the Kitchen fireplace is driving me crazy. I love it so much... but can't decide if I want to paint it white, like the cabinets, doors, and trim/casing, or if I want to paint it a colonial, dusty blue. I would also paint the built in cabinet the same color as the fireplace.
    From James Kroll Fine Woodworking website
    From Covenant Kitchens
    We work a lot with Covenant Kitchens for work... and there is a display cabinet similar to the one above in their showroom that I love. I think the color is very colonial, and would fit with the style/age of the house.
    From Covenant Kitchens
    I feel like adding a new color for these two elements would help break up the amount of white in the room, and help make the eating area more cozy. 


    I did this quick rendering of the fireplace and cabinet in blue.. the walls will be yellow and the trim will be white. What do you think? Blue? White? I need to make a decision soon... it needs to be painted soon!!

    Monday, November 29, 2010

    Our $250 Total Room Remodel

    That almost sounds impossible. Especially when you remember what we were dealing with. But we made it happen. 


    Toilet - $179
    Faucets - $20/ea ($40 total)
    Countertop - $2
    Floor - $25 (vinyl tiles and luan)
    Wall Paint - $0
    Primer/White Paint - $5
    Cabinet Knobs - $10


    Monday, November 22, 2010

    Brick Inside the Walls

    A couple weeks after we bought the house one of our neighbors stopped over. He lives on the other side of the street, in Josiah Wilcox's house, our house's brother. The houses are almost identical on the outside, and he renovated his when he moved in. He asked if we had opened up any of the walls yet, and we said not yet. We were going to when we renovated the Kitchen though. Apparently there is brick inside his walls, between the plaster/drywall and exterior wall sheathing. 


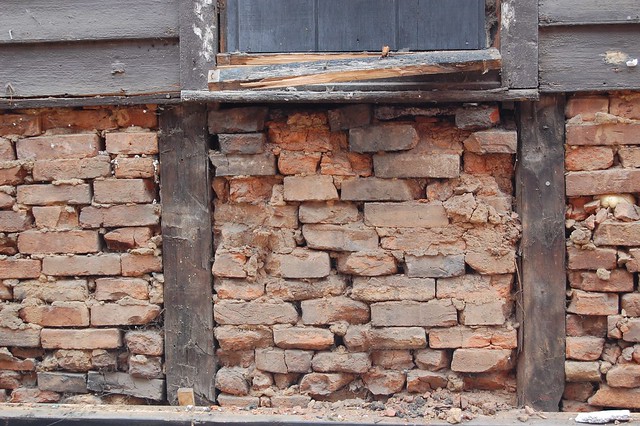
    This weekend when we installed the microwave we had to cut into the wall to install the exhaust vent. And there was the brick. Large clay bricks. It was pretty cool. They were all different sizes, and have marks on them from when they were formed. And some still have some dried plants on them (like grass) which is most likely from the bottom of the pond/lake where the clay came from.


    As cool as this is, R and I (in all of our old house research and schooling) have never heard of this. Brick has no insulating value... the house is post and beam, so the brick isn't structural. What's it there for? My guess is as a fire block.. to keep fire contained either inside the house, or keep it from getting inside and spreading. R thinks it's to keep out stray arrows and bullets. Not sure how serious he was with his guess.


    So I did some research. Turns out I was right. But that wasn't the only reason it was used. According to www.inspectapedia.com, bricks in pre-1900's homes were used mainly as an air-infiltration or wind barrier, kind of like an early insulation (even thought brick has basically no r-value). Brick also helped cut down on sound and contain fire, especially if the house was balloon framed (which ours is not, thank God). This explains a lot. Our house is very good at keeping cool in the summer (not as cool as an air conditioned house, but cool enough to be more comfortable than it is outside), and retains heat pretty well. Despite there being no insulation in the first floor walls, I never feel any drafts at exterior walls (the front door yes, but that's another story), nor do they feel cool to the touch. Houses built today have plywood sheathing underneath the clapboards, as well as an air-infiltration barrier. Our house has the clapboards nailed directly to the posts/studs.


    This was called "nogging". The bricks were never meant to be seen, hence the rough, irregular shaped bricks we found. According to the site, brick nogging is most common in houses built between 1810 and 1900. Our house pre-dates that by almost 40 years. The brick in the walls could also be the reason that we have almost no electrical outlets on exterior walls.


    Another interesting characteristic of homes with brick lined walls is sill damage due to the extra weight (estimated at 400 lbs PER framing cavity (roughly 16")!!). Our sill damage is due mainly to past insect damage, but perhaps it got so bad because the insects started eating away the beam, and then the wall became too heavy for the damaged sill, and it quickened it's demise.


    The weird thing is that all of the pictures I'm seeing of nogging show significant mortar joints. Granted that these bricks were put in quickly and without much care, but we don't even have any mortar! At least not that we can see. All of the bricks we found just seemed to be piled on top of each other, with nothing holding them together other than gravity!
    This picture (from rasala 1234 on flickr) is the closest I can find to what our walls look like.. Just bricks. Pretty cool though!

    Sunday, November 21, 2010

    Microwave Install

    Today R and my dad installed our over-the-range microwave. It is a Kenmore 30" Microwave Combo, Model 8503. We decided to have it vent to the outside, because in our last 2 apartments we have had range vents that vented back into the room and were very unhappy with both of them. The first one would constantly set off the smoke detector, and the second one was just useless.. it wouldn't do anything with the steam, smoke or heat. And we had the perfect opportunity to vent to the outside here.


    In order to accomplish that, we had to cut into the wall that we just drywalled. Praying that we weren't cutting into an electrical chase (seriously, with all of the pictures I take, I couldn't have ONE picture that showed where the electrical chases were?!?), R and my dad cut a hole and discovered brick.
    It wasn't too difficult for them to cut through the brick, and then through the exterior siding. It was actually a lot easier than they had originally envisioned. The new venting went in with almost no problems, and soon the new microwave was installed. It took roughly 2 1/2 hours from start to finish. Very impressive!
    This microwave is amazing. I've only used it twice so far, but wow. I'm so impressed! It's extremely quiet, both the microwave and the exhaust vent. The defrost feature is the best defrost feature I have ever come across! It defrosted ground beef in a minute, perfectly, whereas our old OTR microwave would have taken about 8 minutes or more. The interior is huge... there is the standard turntable and also a metal rack (not sure about that... I thought metal wasn't suppose to be in a microwave?). And you can't beat the price. It was approximately $215! That price is more like what you'd pay for a counter microwave! I just hope that it lasts us a long time! Oh, and for me, the OCD member of this family, it matches PERFECTLY to the range.. love it!